Jump to content
Do Not Sell My Personal Information


  • Join Toyota Owners Club

    Join Europe's Largest Toyota Community! It's FREE!


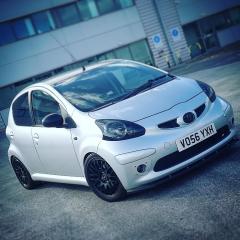
Few Styling Mods To My Mk1 Aygo Since Last Visit..


Recommended Posts

Posted

Been toying with some new wheels for mine, getting more tempted now - did you find the lowered suspension sorted out the pogostick ride?

Posted

Are you referring to the Eibachs springs or the coilovers? The springs alone didnt make much of a difference to ride quality. It was firm, but then so is the stock car IMO. They were a good compromise between handling, appearance (ride height) and ride quality. The coilovers are much firmer than even the Eibachs. Too firm really, but the handling and appearance overule that aspect for me. They wouldnt suit everyone though.

Posted

I don't mind firm, it's bouncy i object to - it really does seem to jitter about quite a bit ... or maybe 18k miles of back road commute has farked my shocks :D

  • 5 months later...
Posted

Couple more pics today. Long live the Mk1 before the Mk2 take over the forum!

IMG_20160326_221331.jpg

IMG_20160326_221916.jpg

Posted

Ok last one I promise..

IMG_20160326_223337.jpg


Posted

Wow! Love what you've done to your car.

Would be amazing if I could get mine anywhere near as good as yours. 

You've also given me loads of great ideas.

Thanks for sharing

Posted

Thanks for the compliments! 😊  would still like bigger wheels though...mods never end..!

Posted

Would be great to see more pictures of what you've done to the interior

Posted

Not a lot tbh, only the seats, double DIN sat nav/stereo, underseat sub, 6x9's on rear parcel shelf, satin black front pillar trims & sunvisors, blue dial/heater LED's, switches on all doors for interior light (also with a dim delay box), leather steering wheel, leather gearknob (on cut down lever) and added a glove box lid. I think its all been covered in my previous threads :)

  • 1 month later...
Posted

OK so the latest mod isnt anything to do with styling but I cant change the thread title and it seems better to keep everything in one place from now on.

Recieved the used maniverter the other day, also came with an o2 sensor which was a bonus. 10 minutes with an angle grinder had me a window in the side with which to administer surgery. Gutting the cat took all of 5 minutes with a hammer and chisel, then had the panel welded back in. Just waiting on a new manifold gasket, downpipe gasket and o2 sensor extender then it can all go on for a test. Will update again once done. Lets hope my ears dont start bleeding...


20160509_113740.jpg

20160509_114322.jpg

20160509_155640.jpg

Posted

Hah - that's gonna drone like a ***** - best make sure you give it the berries in every gear going :D

  • 1 month later...
Posted

Well I've done about 600 miles in the car since the de-cat and to say I'm surprised at the result is an understatement. It's ended up far quieter than I thought it would be, it's barely noticable but does have a deeper tone which sounds really nice. Theres certainly an mpg gain as well (which I wasn't expecting) although I haven't actually measured it yet. I reckon around 20 miles per tank. No ECU light on either so the O2 extender appears to be working.

All in all really chuffed with it :)

Posted

Good work then! Any more poke / revs out of it?

Posted

My only query would be whether an MOT tester will notice the patch and welding on the cat housing, and whether the car could fail an MOT not just on emissions, but also by the fact it could be identified as originally fitted with a cat/no longer has one.

  • Like 1

Posted

Fester: it does feel like it has more midrange which is odd, I would have thought that if anything it would be top end that would gain. Overall, It feels like I am using less throttle to get the same drive which might explain the increase in mpg. Either way, it certainly hasnt lost anything but I think we would be looking at such minimal changes its hard to tell.

Frosty: yes you are right, any tampering would probably be seen as a fail anyway. It would all depend on whether the examiner sees it. I'm not really fussed, I dont think theres any chance it would pass emissions without the cat anyway. I might get them checked just out of curiosity as I have heard that some cars do get through but I am not sure how.


Posted

Loving the work you've done on your car.

I noticed in one of the photos you have a 2 DIN head unit, how did you fit that?

Posted

Cheers Mick

After a bit of searching I found the thread I made at the time:


  • Like 1
Posted

Fantastic, thank you for that. I've got a Double DIN radio I had for a CR-V that's in a box doing nothing so I might as well put it in the 107!

  • 1 month later...
Posted

Just as an update, I am definately getting a noticeable mpg gain after the decat. Regularly seeing 420+ miles with two bars still on the gauge. Never had that prior to decat!

20160814_212359_zpsf7hg1myk.jpg

  • 3 months later...
Posted

On the topic of mpg: I am struggling to get to 399 with 2 bars left. What on earth am I doing wrong?! Might need to add I've only just passed my test so be nice ;) lol

Posted
8 hours ago, AmyLouise1989 said:

On the topic of mpg: I am struggling to get to 399 with 2 bars left. What on earth am I doing wrong?! Might need to add I've only just passed my test so be nice ;) lol

Is it a manual you're driving?

A few things you should consider from my experience:

  • Tyre pressures need to be spot on
  • The revs need to be under control (usually I change gear at 2,000 rpm)
  • Oil needs to be at the right level
  • Make sure the car has been serviced properly. So the oil's been changed, filters, spark plugs even
  • Excess weight in the car: if your boot is full of junk you're paying to drive that junk around
  • Where you fuel up: (I might get shot for this) but I've found supermarket petrol doesn't last as long in the tank as branded fuels (like Shell, BP). This doesn't mean go out and fill up with VPower or stuff like that, just the normal petrol from Shell or BP will last longer than fuel from Asda
  • Speed you're driving at: if the engine is labouring you'll use more fuel. So when you're doing 30mph you should really be in 4th gear, not 5th.

The best I got from my car is 535 miles from the one tank on a long drive from Birmingham to Cornwall Devon (I get the two mixed up) and back. I was absolutely skint at the time and put my last few quid in the car for petrol so I had to make the car drive economically. It meant driving at a constant 55mph on the motorway, looking ahead and anticipating where I should overtake etc. Also if your car is driving around town doing no more than 40mph you're going to use more petrol regardless.

  • 4 weeks later...
Posted

This is my Baby, Cape Town South Africa.

i have included a pic with the new 8j Wheels and stretched tyres.

FB_IMG_1481278421426.jpg

FB_IMG_1481278665913.jpg

FB_IMG_1481278739975.jpg

  • Like 1
  • 3 months later...
Posted

Finally got round to sorting out an armrest today having been prompted by unclefesters recent addition of his genuine Toyota one. I couldnt find one anywhere so I went for an Armster version off the Bay. Not cheap at £60 but it looks good and fits perfectly thankfully. I was worried about clearances but theres no issues whatsoever. Very happy :)

20170318_120908_zpscdmnjdxc.jpg

20170318_121122_zpsylxhyfuh.jpg

20170318_120942_zpspf5t0chq.jpg

  • 9 months later...
Posted

Been a while since a car update, but I have done another little addition to the baby Toyota - lighting.

 
I always said I woud never again retrofit HID lamps to halogen housings and this was based on my experiences with several kits I tried on my motorbikes a few years ago. Beam patterns were awful and the high/low beam transitions with H4 type bulbs (which the Aygo has) were horrendous.
 
So, about a year after I got the Aygo I was happy with my upgraded Philips halogen headlight bulbs and thought about swopping out all the other bulbs for LED versions. This came to an abrupt halt when I couldnt find a decent stop/tail light bulb that worked properly. All of them had the same issue - the light output between modes was so small as to be dangerous. My idea of going LED for all the bulbs was chucked in the bin.
 
Fast foward a couple of years to now and I started hearing about LED headlights. This was something of a revelation, as I had never imagined that they would ever achieve the required light output and besides, at my last research, HID was the de facto source for upgraded headlights, with LED only being used by the manufacturers for DRL's. So the google searches again resumed and as suspected, the web was littered with plenty of LED H4 models but all had the same issues as the retrofit HIDs did years before - beam pattern and poor hi/low modes. That was until I came across the Philips Ultinon offerings. They appeared to have really thought about and dealt with the inherent problems of having dual filaments in one bulb. After looking at many reviews, it appeared that Philips had finally cracked the problem by using extremely small, very high powered LEDs that were staggered to replicate the exact positions of halogen filaments, and a low beam shroud as per usual H4 design. I was very interested in the product, but the price....gulp....£150 for the kit was the cheapest I could find.
 
Anyhoo....you cant take it with you I muttered to myself so a few days later the postie turned up with the kit and on it went. Its a bit of a faff on the Aygo as the original spring clips that hold the bulbs in wont swing over the back end of the LED bulbs as they are considerably longer in the body. A bit of head scratching and I sorted the issue by unclipping one of the two 'legs' that the clip rotates on, worked the clip over the LED body, snipped off a little of the clip end and then worked the end of the leg back into its hole before closing the clip shut. Working behind the headlights on our Aygos is not easy as you know but hey whats a few scratched knuckles.
 
The LED driver boxes were then mounted to the strut turrets and all that remained was to plug in the relevant connectors (easiest part of the whole job) and away we were. I had marked the wall in front of the car with tape prior to fitment, and marked the lowbeam cut offs with the halogens. Blow me if the LEDs matched up exactly with them. I have to admit, there is a tiny amount more scatter but its minimal and its below the cutoff on low beam so no big issue. Now bearing in mind that the halogens I started with were the whitest I could find anywhere, the LEDs were much much whiter. I cannot say that the total light output is considerably more, but the difference is marked in terms of clarity of objects, and of course it looks the business.
 
So, very happy with the result, one thing led (see what I did there) to another and I started looking at what else I could replace with LED. Its funny, you dont realise just how many bulbs are on a car until you think about replacing them all in one hit.
 
Things have obviously moved on regarding stop/tail options since I last looked, and although there are still plenty of rubbish ones around I could at least now find some high end, well designed ones that gave out the right light outputs. Again, quality doesnt come cheap though and the ones I got were £20 a pair. They run Samsung chips and work very well.
 
On top of that I changed the front sidelights (which match the colour of the new headlights nicely), got some amber led's for the front indicators, white ones for the rear indicators and replaced the fog and reverse lights while I was at it. I did have to fit load resistors to the front and rear indicators, this is normal with led due to the reduced load making them flash too quickly. Again, I went for more expensive options as the resistors do take a hammering in terms of heat and I didnt want anything failing. They came with some pre soldered leads on them and some scotch locks but they went in the bin as I much prefer to solder everything when it comes to wiring.
 
On top of that, another 4 leds for the high level brake light and the job was nearly complete except for 2 more...the side repeaters! I thought these would be nice and easy until I found out that the bulbs are sealed within the unit..gaa! I did consider trying to carefully open them up but I managed to find a guy online who was selling some aftermarket ones which had removable bulb holders. £10 a pair and job sorted.
 
So all in all the job has come to around £230 in parts which is a lot of money by any standards but the end result looks great and works very well. Obviously the bulk of that was the headlights but to my knowledge the Philips kit is the only one worth having. Oh and hopefully I should never need to replace another bulb!
 
If anyone else is considering doing this, bear in mind that neither LED nor HID are road legal when retrofitted to housings originally intended for halogen bulbs. I make my choices, you can make yours :)
  • Like 1
Posted

Very interesting @Planemo. I'll have to look in to this, however the only bulb to go in 7 years on mine was the drivers side side light. So I haven't got to thinking about replacements - yet!

One thing I did see the other day which I thought was very cool and a good safety measure was an Astra that had the high level brake light flash when it was applied. So when they started to break it would flash on and off very quickly, then slow down to just being on constantly. Thought it was a great way to alert the day dreamer behind you that you're braking.

Not sure what it is, never even knew it existed until I saw it. I think that'd be a great little addition to the Aygo.

Latest Deals

Toyota Official Store for genuine Toyota parts & accessories

Disclaimer: As the club is an eBay Partner, The club may be compensated if you make a purchase via eBay links

Create an account or sign in to comment

You need to be a member in order to leave a comment

Create an account

Sign up for a new account in our community. It's easy!

Register a new account

Sign in

Already have an account? Sign in here.

Sign In Now


×
×
  • Create New...


Forums


News


Membership


  • Insurance
  • Support